Release Notes
Connected Components Workbench (CCW) Developer Edition single software to program, simulate, configure, and visualize.
Version 11.00.00 (released 3/2018)
Catalog Number Connected Components Workbench - Dev Ed
Requirements
This release has the following requirements.
The following are the system requirements for Connected Components Workbench version 11.00.00.
Hardware requirements
To use this release of Connected Components Workbench software effectively, your personal computer should meet the following minimum hardware requirements. Using a computer exceeding the recommended characteristics will improve performance.
- Processor: Pentium® 4 2.8GHz or equivalent minimum, Intel® Core™ i5 2.4 GHz or equivalent recommended
- RAM: 2 GB minimum, 8 GB recommended
- Hard disk space: 10 GB free
- Optical drive: DVD-ROM
- Pointing device: Any Windows®-compatible pointing device
Software requirements
This release is supported on the following operating systems:
- Windows 7 Service Pack 1 (32-bit and 64-bit)
|
Important:
|
Attempting to install Connected Components
Workbench on a computer running Windows 7
without Service Pack 1 or later will fail.
|
- Windows 8 (32-bit and 64-bit) - requires .NET Framework 3.5 SP1 to be installed
- Windows 8.1 (32-bit and 64-bit) - requires .NET Framework 3.5 SP1 to be installed
- Windows Server® 2008 R2 Service Pack 1
- Windows Server 2012 - requires .NET Framework 3.5 SP1 to be installed
- Windows Server 2012 R2 - requires .NET Framework 3.5 SP1 to be installed
- Windows Server 2016 - requires .NET Framework 3.5 SP1 to be installed
- Windows 10 (32-bit and 64-bit) - requires .NET Framework 3.5 SP1 to be installed
Connected Components Workbench software has dependencies upon the following software components. These components will be installed with the Connected Components Workbench software if they are not already present and updated if required.
- ControlFLASH 15.00
- FactoryTalk Activation Manager v4.02 (CPR 9 SR 10)
- FactoryTalk Diagnostics v3.00 (CPR 9 SR 10)
- Rockwell Automation® USBCIP Driver Package (x86) 3.18
- Rockwell Automation Driver Package (x64) v2.01
- RSLinx Classic 4.00 (CPR 9 SR 10)
- MicroLogix to Micro800 Conversion Tool 4.00
- Current Program Updater
- Microsoft® .NET Framework 4.5.1
- .NET Framework 4.5 Multi-Targeting Pack
- .NET Framework 4.5 SDK
- .NET Framework 4.5.1 Multi-Targeting Pack
- .NET Framework 4.5.1 Multi-Targeting Pack (ENU)
- .NET Framework 4.5.1 SDK
- Microsoft Help Viewer 2.1
- SQL Server 2012 Management Objects
- Visual Studio® 2013 Shell (Isolated)
- MSXML 6.0 Parser and SDK
- SQL Server® Compact (x86) ENU or SQL Server Compact (x64) ENU 4.0.8482.1
- OPC® Core Components Redistributable (x86) 2.01.1 or OPC Core Components Redistributable (x64) 2.01.1
Important: | Uninstalling the Connected Components Workbench software does not remove these components. After verifying that other software is not relying on them, they can be removed manually. |
Features
This release includes the following system features.
Connected Components Workbench version 11.00.00 software has the following new and enhanced features:
New features
The following new features are introduced in this release:
- Micro870 controllers support
- Connected Components Workbench version 11.00.00 provides the function to add two Micro870 controllers to projects, 2080-LC70-24QWB and 2080-LC70-24QBB.
- 2085-EP24VDC expansion I/O power supply module is able to supply sufficient power for up to an additional 4 expansion I/O modules for a total of 8.
- 2080-MEMBAK-RTC2 with support for the increased memory of the Micro870
- Additional Micro800 instructions are supported.
- 2080-MOT-HSC plug-in
- HSCE
- HSCE_CFG
- HSCE_CFG_PLS
- HSCE_READ_STS
- HSCE_SET_STS
- Supports Micrologix migration
- LFL(LIFO load)
- LFU(LIFO unload)
- Supports missing battery feature of Micro870
- RTC_READ2
- Installation
- The installation setup wizard's user interfaces and installation process are updated to align with other Rockwell Automation software products to improve usability and convenience.
- Installation Record and Playback from the Install user interfaceUse Record and playback from the Install user interface to record inputs to a record file and to playback the record on other computers. Record and Playback provides an easier option to using parameters. Also use Record and Playback to customize the installation of components and features.
- Installs MicroLogix to Micro800 Conversion Tool 4.00 with the Connected Components Workbench software.
- Installs Spectrum Controls 2085 expansion module profiles: 2085sc-IF 16C, 2085sc-IF 16V, 2085sc-IF8u, 2085sc-OF8.
- MicroLogix to Micro800 Conversion Tool supports conversion from Micrologix 1100, Micrologix 1200, Micrologix 1400 and Micrologix 1500 to Micro800 series of controllers.
- GuardShield 450L safety light curtain supports new hardware type GuardShield 450L-E.
- PanelView 800 DesignStation
- PanelView 800 DesignStation color palette supports 65k colors.
- Symbol library is arranged in categories for easy selection.
- Supports font and screensaver download to the terminal
Enhanced features
The following features are modified in this release to improve performance or usability:
- Module Profile Tool 2.00.00 Supports plug-in modules and expansion modules profiles for Encompass™ partner products.
- Micro800 Fault diagnostics
-
For controller project version 11.00.00 and later, the fault diagnostic view is upgraded to show the
last seven recoverable and last seven non-recoverable faults with the POU locations if
available.
- UDFB/UDF local variables
Build error will not occur if create more than 128 UDFB/UDF local variables. The number of UDFB/UDF local variables are not limited.
Corrected Anomalies in This Release
This release corrects the following anomalies.
The following list identifies the anomalies corrected in Connected Components Workbench version 11.00.00.
- Current Program Updater checks Connected Components Workbench updates every 24 hours which is too often. [14325]
-
In this release, the Current Program Updater checking cycle changed to 30 days. The
dependency is Connected Components Workbench 11.00.00 is the first Rockwell Automation
product with Current Program Updater installed. If other Rockwell Automation products or
Connected Components Workbench earlier version has been installed, the 24 hours
update checking cycle will not change.
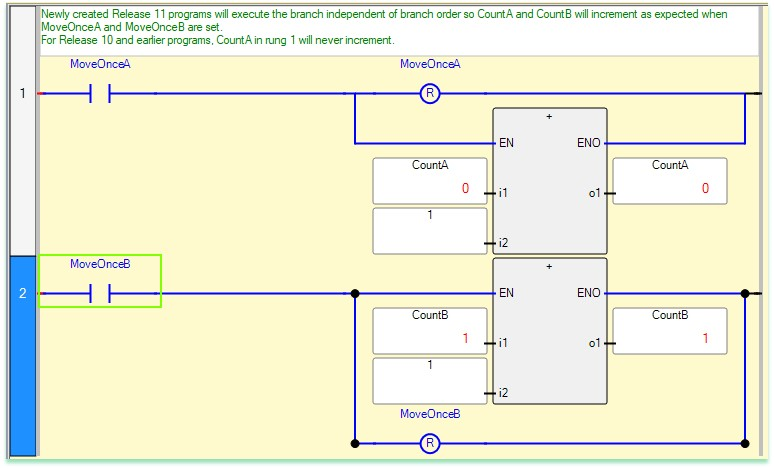
- Ladder logic branch execution depends on the order of parallel branches. [14102]
-
For newly created projects using Connected Components Workbench 11.00.00 and later,
ladder logic branch execution will not depend on the order of parallel branches, which is
the same as MicroLogix controllers.
- If project is created in CCW version 11.00.00, then it’s a new project and execution of parallel branches does not depend on the order. Controller change is considered a new project.
- If project is created in CCW version 10.00.00 or earlier, then it’s an older project and execution of parallel branches continues to depend on the order, so behavior for older projects is unchanged. Modifying an older project in CCW version 11.00.00 is still considered an older project.
Programming Example:
Known Anomalies in This Release
This release has the following known anomalies.
- When using Connected Components Workbench version 8.00.00, if a project includes motion
instances, including MC_AbortTrigger, MC_Power, MC_ReadAxisError,
MC_ReadBoolParameter, MC_ReadParameter, MC_ReadStatus, MC_Reset,
MC_SetPosition, MC_TouchProbe, MC_WriteBoolParameter, MC_WriteParameter, after
changing controller, building project will fail. First identified in Connected Components Workbench version 11.00.00. [14136]
To avoid this problem, after controller is changed, re-select these instruction by double clicking on the function block and then clicking on OK.
- When upgrading Connected Components Workbench from version 10.00.00 to 11.00.00 in a Microsoft Windows 10 system, an error message may appear during upgrading: "Cannot find one or more components. Please reinstall the application." First identified in Connected Components Workbench version 11.00.00. [80881]
Please click OK in the dialog box, and the upgrade will proceed successfully.
- Micro870 retained UDFB instances can result in slow performance when editing UDFB local variables. User Defined Function Blocks that have instances declared with the Retained attribute set (i.e. save UDFB local variables upon power down and restore on power up) may result in slow performance when adding, deleting, or modifying UDFB local variables. The performance degradation is more noticeable when UDFBs are nested (i.e. UDFB calls another UDFB), UDFB has many instances, or many local UDFB variables exist. First identified in Connected Components Workbench version 11.00.00. [73004]
To avoid this problem, uncheck the Retained attribute of the UDFB instances when editing the UDFB local variables. If the UDFB local variables need to be retained, re-check the Retained attribute of the UDFB instances after local variable editing is finished. Due to this anomaly, do not declare more than 128KB of retained variables in your project.
Functional Changes
This release has the following functional changes from the previous release.
Connected Components Workbench version 11.00.00 has the following changes in functionality since the last release:
- Adobe Acrobat Reader
-
The Adobe® Acrobat® Reader® is removed from Connected Components Workbench
installation media and may need to be installed manually from the Adobe
website https://get.adobe.com/reader/.
- Adding or removing software components
-
When updating the existing installation, by default, the products are selected if they have
been installed. Clear the product you want to uninstall, or select the product you want to
install, and click Install.
- Cross Reference
-
By default, the cross reference data will not be loaded when opening the project. The data
will be loaded when opening the Cross Reference Browser or Unused Variable Browser.
- Refer to Corrected Anomaly [14102]. Ladder Execution order for branches may have changed for newly created projects.
- When discovering drives from connection browser, the discovered drives will not be automatically added to the project. After connecting to the drive, click Add to Project to add the drive to the project organizer.
Application Notes
This release has the following application notes.
The following are the application notes for Connected Components Workbench 11.00.00.
Restarts during install of Connected Components Workbench software
Some Microsoft components may require a restart before the full Connected Components Workbench software installation is complete. If the Connected Components Workbench software does not install completely, restart the computer, the Connected Components Workbench software automatically continues installing.
Install of Connected Components Workbench version 11.00.00 software
If you have a previous version of Connected Components Workbench software installed, it is recommended to :
- Backup your projects in case you need to revert to an earlier version of Connected Components Workbench software.
- Uninstall the previous version of Connected Components Workbench software from your computer.
To install the Connected Components Workbench software:
- Download the current version of Connected Components Workbench software (Standard or Developer Edition).
- Launch Setup.exe.
- You must manually install .NET Framework 3.5 SP1 if you are using Windows 8, Windows 8.1, Windows 10, Windows Server 2012, Windows Server 2012 R2, or Windows Server 2016.
- On the Connected Components Workbench Setup dialog box, select the products which you want to install, or specify a different drive where you want to install the software, and then click Next. By default all products are selected and installed with the Connected Components Workbench software. To remove a product or language from the current installation, clear the check box.
- (optional) If installing the Developer Edition, enter the product serial number when prompted, and click Install.
- On the End-User License Agreements dialog box, read the agreements, and click Accept all to continue the installation, or click Decline to return to the previous page.
- (optional) If there are multiple Ethernet adapters in the computer, select one as the default from the popup window. Silent install mode will not provide the selection during installing, configure it in RSLinx Classic after installation completes.
- When prompted to restart your computer during the installation, click Restart now to restart your computer and continue the installation, or Restart later to suspend and exit the installation.
- On the That's it! dialog box, click Close to exit the installation. Meanwhile, you can also:
- Click Installation Summary to see the installation details.
- Click Register for updates to learn how to receive email updates about product patches.
- Click Download it free to install Adobe Acrobat Reader.
- The Connected Components Workbench installation is complete.
To upgrade an existing installation:
- Stop your current version of Connected Components Workbench.
- Perform the installation steps in the order presented on the screen.
- Modify the products you want to install or uninstall.
- Clear the product you want to uninstall. By default, the products are selected if they have been installed.
- Select the product you want to install.
- Click Install.
- Restart your computer to complete the update.
Unattended or silent install
Use command-line parameters to perform an unattended or silent installation of the software.
Command-line parameters
The following table identifies the installation command-line parameters. Command-line parameters are case-insensitive. However, if a specified value includes a space, be sure to enclose the value in quotation marks (for example, "value with spaces").
|
Parameter
|
Description
|
|
/?
|
Displays the usage options for installation parameters.
|
|
/Q
|
Silent Install, install runs in a quiet mode without any user interface.
This parameter is recommended when deploying the software installation
using an IT tool or script, and don’t expect any error or restart messages.
When using this parameter, check the error codes, and respond as needed.
For example, if the installation returns error code 1641, then the IT tool or
script should restart the computer and relaunch the installation after restart.
This parameter is required if /QS is not specified.
|
|
/QS
|
Unattended Install, install runs in a quiet simple mode and shows progress
through the UI, it does not accept any input but still shows error or restart
messages.
When using this parameter, the installation will stop and display a prompt if
there are error or restart messages. For example, if an immediate restart is
required to complete the install, a restart message will be displayed to confirm
the restart. Installation resumes automatically from the point of interruption
after restart.
This parameter is required if /Q is not specified.
|
|
/IAcceptAllLicenseTerms
|
Acknowledges acceptance of the license terms.
This parameter is required for /Q or /QS parameters.
|
|
/AutoRestart
|
Automatically restarts the computer after the installation is complete. Used
when a restart is required to complete the installation.
This parameter is optional. If this parameter is not used silent install (/Q) will
return either error code 1641 or 3010 if a restart is required, and unattended
install (/QS) will result in a confirmation prompt that must be agreed to before
the installation is completed.
|
|
/SetupLanguage="value"
|
Specifies which language will be displayed during install process.
The value must be the one of the following:
This parameter is optional. If this parameter is not used, the default language
is the current user or operating system user interface language.
|
|
/Product="value"
|
Specifies which sub-products will be installed.
Only required if sub-products are included with the install package.
If the software does not include sub-products this parameter is not available.
|
|
/ProductLanguage="value"
|
Specifies the language version of the software being installed.
The value must be one of the following:
This parameter is optional. If this parameter is not used, the default language is the same as the setup language. If the software does not support multiple languages this parameter is not available. | /InstallLocation="value"
Or
/InstallDrive="value"
|
Specifies the install location or install drive respectively.
This parameter is optional. If this parameter is not used, the default install
location is "C:\Program Files (x86)\Rockwell Software".
Some software restricts the installer to only change the drive the software is
installed on. Use /? to determine which parameter is supported.
|
|
/SerialNumber="value"
|
Specifies the serial number of the software being installed. This is used to
activate the software during installation.
This parameter is optional. If it is not specified the software must be activated
manually after installation if activation is required.
Some software does not require activation. If activation is not required this
parameter is not available.
|
|
/ProductKey="value"
|
Specifies the product key used to get activation keys during installation.
This parameter is optional. If it is not specified the software must be activated
manually after installation if activation is required.
Some software does not require activation. If activation is not required this
parameter is not available.
|
|
/Version="value"
|
Specifies the version of the software to activate which corresponds to the
product version associated with the SerialNumber and ProductKey.
This parameter is optional. If it is not specified the installer will use the most
recent product version available.
Some software does not require activation. If activation is not required this
parameter is not available.
|
Examples
The following examples show how to use the installation commands.
- To install the software with no user interface using the default settings during the installation process. (Silent install)
Setup.exe /Q /IAcceptAllLicenseTerms
- To install the Chinese language version of the software on the D: drive and display the progress, error, or complete messages during installation and restart the computer if necessary. (Unattended install)
Setup.exe /QS /IAcceptAllLicenseTerms /AutoRestart /SetupLanguage=CHS
/InstallDrive=D:
Error codes
The following table identifies the error codes that can be returned by an installation.
|
Error Code
|
Value
|
Description
|
|
ERROR_SUCCESS
|
0
|
The installation completed successfully.
|
|
ERROR_INVALID_PARAMETER
|
87
|
One of the parameters was invalid.
|
|
ERROR_INSTALL_USEREXIT
|
1602
|
The installation was cancelled by the user.
|
|
ERROR_INSTALL_FAILURE
|
1603
|
A fatal error occurred during installation.
|
|
ERROR_BAD_CONFIGURATION
|
1610
|
The configuration data for this product is corrupt. Contact your
support personnel.
|
|
ERROR_SUCCESS_REBOOT_INITIATED
|
1641
|
The installer has initiated a restart. After restart installation will
continue.
|
|
ERROR_SUCCESS_REBOOT_REQUIRED
|
3010
|
A restart is required to complete the installation. After restart the
product is successfully installed.
|
|
ERROR_SUCCESS_RELAUNCH_REQUIRED
|
3011
|
Restart of setup needed before installation can continue.
|
VeriSign Universal Root Certification Authority certificate
If the VeriSign Universal Root Certification Authority certificate does not exist on the local computer, the certificate is installed while installing Rockwell Automation software. Use Microsoft Management Console (MMC) to view the certificate in Console Root > Certificates (Local Computer) > Trusted Root Certification Authorities > Certificates.
Convert an existing project to the current release
To use the most current features on projects created in previous versions of Connected Components Workbench software, convert the project to the current release by opening the project in the latest Connected Components Workbench software. This will automatically convert the project’s databases to the current release.
An existing project that is converted to the current release, opened and saved in the current release, or downloaded to a Micro800 controller cannot be opened in a previous release. If a project is shared, all users must upgrade to the current release of the Connected Components Workbench software to continue using the project.
When you open a project created in a previous release of the Connected Components Workbench software, the project database automatically updates to the current release, which allows access to the latest Connected Components Workbench features. However, to use new device specific features in the current release, you may also need to use the device's upgrade feature to upgrade the device. For example, for Micro800 use the Change Controller feature to update the controller firmware revision to the latest revision to make use of newly added instructions.
User account types for Connected Components Workbench software
When you create new projects or open existing projects, we recommend you do not use the default Guest user account, and that you use the same type of account you used when you installed the Connected Components Workbench software. That is, if you were logged in under an administrator account when you installed the Connected Components Workbench software, you should log in with an account that has administrator privileges when you use the Connected Components Workbench software.
To change to an administrator account:
- Navigate to: \\Program Files > Rockwell Automation > Connected Components Workbench.
- Right-click CCW.Shell.exe, select Run as, select Administrator user.
- Click OK.
File Extensions and locations
Connected Components Workbench software creates and uses the file extension .ccwsln for user-created projects.
By default, the product-managed files are saved to:
c:\Users\<user>\Documents\CCW\<Project#>\<project#>.ccswln
Connecting to a Micro800 controller on a virtual machine
If you install RSLinx Classic on a virtual machine (for example, VMware®), make sure to disable RSLinx Classic on the host computer before you plug the USB cable that is attached to your Micro800 controller into the host computer. If you ignore this step, the host computer will obtain the driver for the Micro800 controller, and the virtual machine may not be able to detect the Micro800 controller.
Connecting to a Device using Ethernet
Using the default EtherNet/IP driver to connect to a device
If you use Ethernet instead of a USB to connect to the controller, the Ethernet/IP driver is installed by default in RSLinx and you can connect to devices which are on the same subnet as the PC. If a DHCP server is available, in most cases your computer and the device (such as, Micro850 controller which defaults to DHCP) will be assigned IP addresses that will allow them to communicate using this Ethernet/IP driver. The Ethernet/IP driver will browse for all devices on the subnet.
In cases where the device is not on the same subnet as the PC or you do not wish to view all devices on the subnet, it is recommended to install the Ethernet Devices driver which requires manually entering the IP address of the device.
To add the Ethernet Devices driver to connect to a device
Note: Be sure to select the correct port (it may not be the Windows default).
- Click Communications > Configure to open the Configure Drivers dialog box.
- In Available Driver Types, select Ethernet Devices.
- Click Add New, and type a name for the driver or accept the default name.
- If prompted, enter the Ethernet adapter selection. Be sure to select the correct port (it may not be the Windows default).
- For each device enter the IP address (or Host Name if DNS is supported) under Host Name. It is recommended to append ":EIP" to the IP address for better performance by avoiding the older CSPv4 port 2222. Click Add New as necessary. Click OK, then Close when finished.
- For the device, click Connect to open the Connection Browser.
- Expand the Ethernet Devices driver you previously added.
- Select the controller that you want to connect to from your project and then click OK.
Security considerations
Connected Components Workbench software and its included software components require running system services and network access to communicate with controllers, drives, graphic terminals, and other devices. You may need to enable system services or configure firewall rules in order for Connected Components Workbench software to function properly. However, Connected Components Workbench software does not require endpoint firewall rules because it is not a server product that allows remote clients.
For a list of services that require network access, as well as detailed information on security concerns, see Security considerations when using Rockwell Automation Software Products (Knowledgebase Answer ID 609492).
For a list of TCP/UDP ports used by Rockwell Automation products, see TCP/UDP Ports Used by Rockwell Automation Products (Knowledgebase Answer ID 898270).
View Connected Components Workbench 11.00.00 Help with Help Viewer 2.1
The Help Viewer 2.1 Filter is designed to keep the search list compact and manageable. Titles appear in the filtered table of contents (TOC) list only if they contain the root of the term used in the filter and the empty TOC levels are collapsed with an ellipsis (…).
For example, if you specify "troubleshooting" as a filter, only titles that contain "troubleshoot" or "troubleshooting" appear. Nodes whose titles do not contain the term are collapsed to a single node with an ellipsis (...).
In the filtered TOC you can do the following:
- Mouse over an ellipsis (...) in the filtered TOC to show the corresponding topic title in a popup window.
- Close the Filter to show the unfiltered TOC.
Internet Explorer security settings
Internet Explorer® high security settings can prevent some help features from working as expected.
- For PCs running Windows operating systems, change the Internet zone security level to Medium.
- For PCs running Windows Server 2008 and Windows Server 2012, you might need to adjust the browser security settings.
To view Connected Components Workbench Help in Help Viewer 2.1
- Open Internet Explorer.
- On the Tools menu, click Internet Options, then click the Security tab.
- Select the Internet zone, then click Custom level and change the following settings:
- Enable MIME Sniffing – set to Enable
- Active scripting – set to Enable
- After changing the Internet Explorer security settings, open Connected Components Workbench and verify the help displays in Help Viewer 2.1.
Current Program Updater
In order for the Current Program Updater to work seamlessly, run the Current Program Updater software at least once after installation. The Current Program Updater only updates permissions on directories of applications that are being updated. Applications not related to the Current Program Updater are not affected.
To configure the Current Program Updater:
- If your user account is an administrator account, close Current Program Updater, and then right-click the Current Program Updater shortcut and choose Run as administrator.
-
If your user account is a standard account, ask for assistance from an IT person with
administrator login credentials.
- Run the Current Program Updater as you normally would. The Current Program Updater automatically corrects any missing permissions. The next time you run the Current Program Updater revert back to running the standard way.
VMware compatibility
Compatibility with VMware has not been formally tested, but it has been used extensively with Connected Components Workbench.
- If you experience poor performance using VMware with a Windows 7 guest, you may need to upgrade VMware or run Connected Components Workbench on the host operating system. Connected Components Workbench and other software may try to access the networks, to ensure optimal system performance, you may need to disable network adapters.
- If you use Connected Components Workbench software with VMware, you may have to manually connect USB devices. When a virtual machine is running, its window is the active window and a USB device is plugged into the host computer, the device automatically connects to the guest instead of the host. This autoconnect feature can be disabled in the USB Controller panel of the virtual machine settings editor (VM > Settings). If all of the virtual machine's USB ports are already occupied when it is trying to connect automatically to a new device, a dialog box gives you a choice: you can either disconnect one of the existing USB devices to free its port or ignore the new device, allowing the device to connect to the host.
Manually connecting a virtual machine to a USB device
- Choose VM > Removable Devices to connect specific USB devices to your virtual machine. If the physical USB devices are connected to the host computer through a hub, the virtual machine sees only the USB devices, not the hub.
- There is a menu item for each of the USB ports. Move the mouse over one of these items to see a cascading menu of devices that are plugged into your host computer and available for use. To connect a device to the virtual machine, click its name.
- If a device is already connected to that port, click the name of a new device to release the first device and connect the new one.
- To release a connected device, click None on the cascading menu for the port to which it is connected.
- If you physically plug a new device into the host computer and the auto connect feature does not connect it to a virtual machine, the device is initially connected to the host. Its name is also added to the VM > Removable Devices menu so you can connect it to the virtual machine manually.
Downloading available firmware
The only firmware files installed with Connected Components Workbench 10.00.00 and later are the two most recent firmware versions for the Micro800 controllers. Additional firmware files (.dmk) are available for download from the Rockwell Automation Compatibility and Downloads web page.
Downloading sample code
If upgrade Connected Components Workbench from earlier version to 11.00.00, the Sample Code and Device Manuals of the earlier version should be downloaded manually. The latest Sample Code and Device Manuals are available for download from the Rockwell Automation Compatibility and Downloads web page.
Activation and grace period
If the Connected Components Workbench Developer Edition is unable to connect to the FactoryTalk Activation server, it enters a seven-day grace period. Once the grace period expires, Connected Components Workbench will run as Standard Edition.
Installing language package
If a German or Italian Connected Components Workbench version is installed in Windows 8 or Windows Server 2012 and later with different language version, install the German or Italian Language Pack on your operating system.
Spectrum Controls module configuration tool
For the Spectrum Controls module configuration tool, it is installed to ‘C:\Program Files (x86)\Rockwell Automation\CCW\SpectrumTool\ModuleConfigConverter.exe’. This launch path can be configured as part of the module’s profile.
Copyright © 2025 Rockwell Automation, Inc. All rights reserved.
Rockwell Automation, Allen-Bradley, and FactoryTalk are trademarks of Rockwell Automation, Inc.
To view a complete list of Rockwell Automation trademarks please click here.
Trademarks not belonging to Rockwell Automation are property of their respective companies.